This blog post will detail the mechanism of migrating from traditional data warehouses to the modern data warehouse Google BigQuery.
Traditional data warehouses aren’t designed to handle today’s explosive data growth, run advanced analytics, or scale quickly and cost-effectively. As a modern and serverless data warehouse solution, BigQuery addresses your current analytics demands while scaling as your data needs grow.
Our expertise at aiCloudPods in using the GCP’s migration techniques, easy-to-use tools and code-free tools can jump-start your modernisation and help you manage the end-to-end process.
Why GCP for Data Warehouse modernisation?
- Accelerate time to insight with serverless analytics
- Significantly simplify operations and lower TCO
- Secure your data and operate with trust
- Easily modernize with Google Cloud’s migration framework
Different Migration Architectures and Techniques in GCP:
- BigQuery Transfer Service- Redshift Migration
- Cloud Data Fusion – Visual Pipelines to run seamlessly
In this Blog series, we will explain how to migrate your data and pipelines from Amazon Redshift to BigQuery:
Key steps in Migration of Datawarehouse application is:
- Data Schema Validation and Migration
- Meta Data Migration
- Data Migration
- Pipelines Identification and Migration to GCP
- Reporting Tools / Service Migration
Redshift Migration to BigQuery:
There are different ways to migrate a Data warehouse application and data into BigQuery from Redshift and below section describes the BigQuery Data Transfer migration service to migrate the data
The BigQuery Data Transfer Service allows you to copy your data from an Amazon Redshift data warehouse to BigQuery:
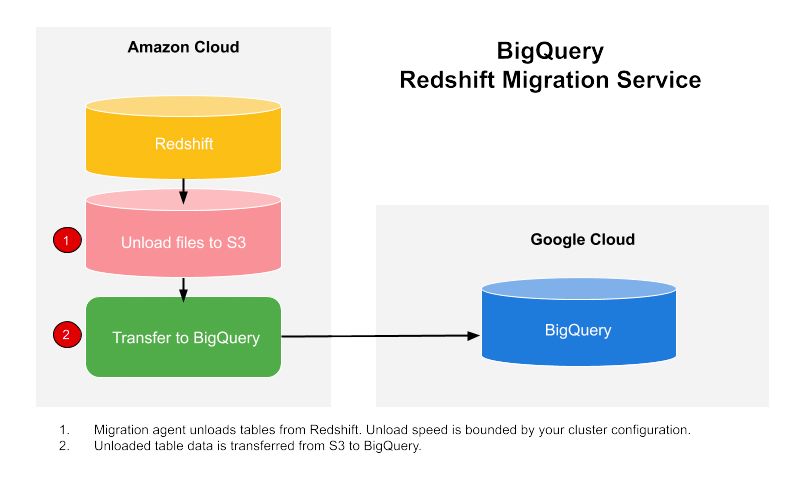
The service will engage migration agents in GKE and trigger an unload operation from Amazon Redshift to a staging area in an Amazon S3 bucket. Then the BigQuery Data Transfer Service transfers your data from the Amazon S3 bucket to BigQuery.
This diagram shows the overall flow of data between an Amazon Redshift data warehouse and BigQuery during a migration.
Step-by-step process of setting up a data migration from Amazon Redshift to BigQuery.
- GCP requirements: meet the prerequisites and set permissions on Google Cloud.
- Grant access to the Amazon Redshift Cluster.
- Grant access to your Amazon S3 bucket you’ll use to temporarily stage data. Take note of the access key pair, for use in a later step.
- Set up the migration with the BigQuery Data Transfer Service.
You will need:
- The Amazon Redshift JDBC url.
- The username and password of your Amazon Redshift database.
- The AWS access key pair you obtain from the step
The URI of the Amazon S3 bucket. We recommend that you set up a Lifecycle policy for this bucket to avoid unnecessary charges. The recommended expiration time is 24 hours to allow sufficient time to transfer all data to BigQuery.
Required permissions
Before creating an Amazon Redshift transfer:
- Ensure that the Service Account creating the transfer has the following required permissions in BigQuery:
bigquery.transfers.updatepermissions to create the transferbigquery.datasets.updatepermissions on the target dataset
- The
bigquery.adminpredefined Cloud IAM role includesbigquery.transfers.updateandbigquery.datasets.updatepermissions. - The Amazon S3 source data must have the AWS managed policy
AmazonS3ReadOnlyAccessapplied to it.
Google Cloud requirements
To ensure a successful Amazon Redshift data warehouse migration, make sure the following prerequisites on Google Cloud are setup:
- Choose or create a Google Cloud project to store your migration data.
- In the Cloud Console, go to the project selector page.
- Select or create a Cloud project.
- Enable the BigQuery Data Transfer Service API.
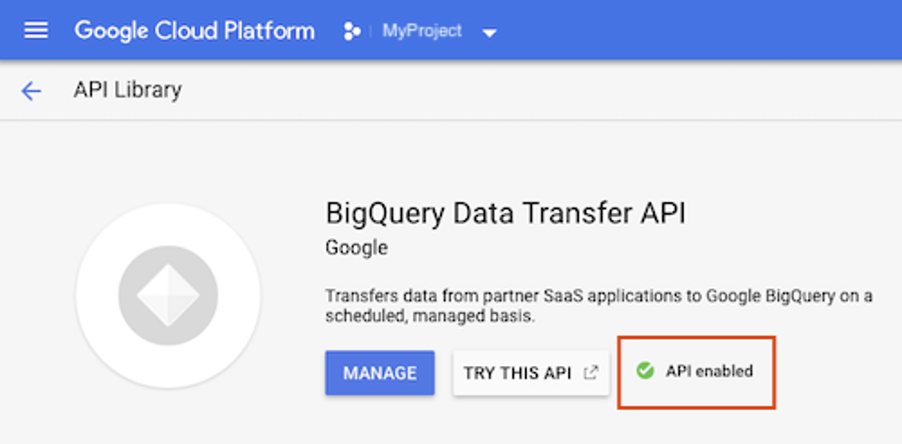
BigQuery is automatically enabled in new projects. For an existing project, you may need to enable the BigQuery API. A green checkmark indicates that you’ve already enabled the API.
- Create a BigQuery dataset to store your data. No need to create any tables.
- Allow the BigQuery Data Transfer Service permission to manage your transfer. (Allow pop-ups in your browser from bigquery.cloud.google.com so that you can view the permissions window when you set up the transfer.)
- Grant access to your Amazon Redshift cluster
- whitelist the IP addresses that correspond to your dataset’s location, or you can whitelist all of the Google-owned IP addresses are reserved for Amazon Redshift data migrations.
- Grant access to your Amazon S3 bucket
- S3 bucket to be used as a staging area, for transferring the Amazon Redshift data to BigQuery.
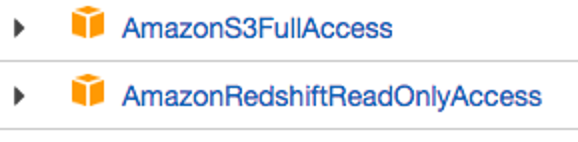
We recommended you create a dedicated Amazon IAM user, and grant that user only Read access to Redshift and Read and Write access to S3. This can be achieved by applying the following existing policies:
Create an Amazon IAM user access key pair.
Setting up an Amazon Redshift transfer
To set up an Amazon Redshift transfer:
Go to the BigQuery web UI in the Cloud Console.
Go to the Cloud Console
- Click Transfers.
- Click Add Transfer.
- On the New Transfer page:
- For Source, choose Migration: Amazon Redshift.
- For Display name, enter a name for the transfer such as
My migration. The display name can be any value that allows you to easily identify the transfer if you need to modify it later.
- For Destination dataset, choose the appropriate dataset.
- Under Data Source Details, continue with specific details for your Amazon Redshift transfer.
- For JDBC connection url for Amazon Redshift, provide the JDBC url to access your Amazon Redshift cluster.
- For Username of your database, enter the username for the Amazon Redshift database you’d like to migrate.
- For Password of your database, enter the database password.
By providing your Amazon credentials you acknowledge that the BigQuery Data Transfer Service is your agent solely for the limited purpose of accessing your data for transfers.
- For Access key ID and Secret access key, enter the access key pair you obtained in the step “Grant access to yout S3 bucket”.
- For Amazon S3 URI, enter the URI of the S3 bucket, that is staging area for the transfer..
- For Amazon Redshift Schema, enter the Amazon Redshift Schema you’re migrating.
- For Table name patterns specify a name or a pattern for matching the table names in the Schema. You can use regular expressions to specify the pattern in the form:
<table1Regex>;<table2Regex>. The pattern should follow Java regular expression syntax.
Examples:
lineitem;ordertbwill match two tables namedlineitemandordertb.- Leave this field empty to migrate all tables from the specified schema.
For very large tables, we recommend transferring one table at a time
- In the Notification options section:
- Click the toggle to enable email notifications. When you enable this option, the transfer administrator receives an email notification when a transfer run fails.
- For Select a Pub/Sub topic, choose your topic name or click Create a topic. This option configures Pub/Sub run notifications for the transfer.
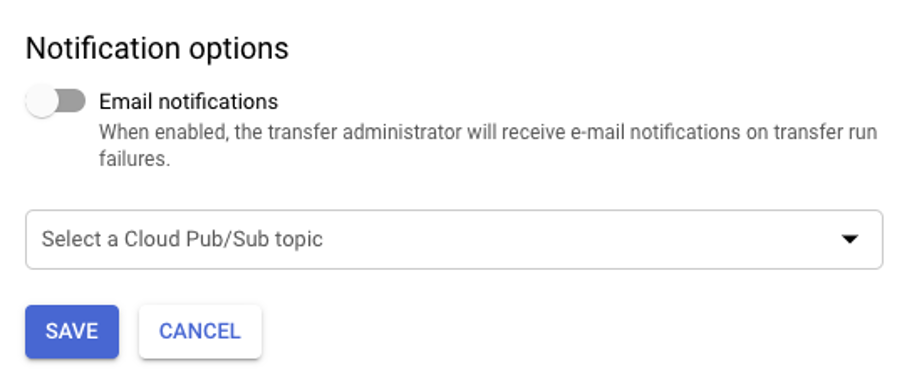
- Click Save.
- The Cloud Console will display all the transfer setup details, including a Resource name for this transfer.
If multiple transfers are created for the same Redshift tables, the data is appended to the same BigQuery destination tables. The data is not deleted or overwritten.
Quotas and limits
BigQuery has a load quota of 15 TB, per load job, per table. Internally, Amazon Redshift compresses the table data, so the exported table size will be larger than the table size reported by Amazon Redshift. If you are planning to migrate a table larger than 15 TB, please reach out to bq-dts-support@google.com first.
Note that costs can be incurred outside of Google by using this service. Please review the Amazon Redshift and Amazon S3 pricing pages for details.
Because of Amazon S3’s consistency model, it’s possible for some files to not be included in the transfer to BigQuery.